Working with stretch ceilings consists of several stages:
1. Removal of measurements;
2. Installation of the mounting structure;
3. Installation of posts for spotlights;
4. Installation of bed;
5. Installation of lighting
Especially in dealing with stretch ceilings:
getting your strainer cloth, remove it from the carton without removing the packaging material, place in a warm room. Never place anything on top folded cloth!
All ceilings, wider than 135sm have a weld, which is performed at the factory for high-frequency welding machines. Welds are performed at intervals of 130, 150 or 200 cm depending on the type of film. Sutures are technically necessary, since the seamless production in the world does not yet exist, and our computer program will place the welds so with respect to the coverage that they are actually invisible.
In addition, the varnish films are sometimes noticeable wrinkles that are not factory defects. Creases in the film appear as a result of transport or storage of long cloth, ready to be installed. It is recommended not to keep the lacquer painting over 5-7 days in order to avoid the appearance of wrinkles. Unfortunately, no laboratory, which examined a similar phenomenon can not answer the question of how to deal with the audience. What can be said with certainty is that the wrinkles gradually disappear over time, for 4-6 months after installation of the canvas.
In the process of making your ceiling is reduced by 3-6%, which allows you to stretch the canvas, slightly heating it, and to avoid sagging of the canvas. In the case of high ceilings, an area of over 60m2, we recommend dividing the profile set to avoid sagging of the canvas.
Removing the measurement is the most critical part of a stretch ceilings, since this directly determines the final result. You need accuracy to within 0.5 cm
Cutting the ceiling is used a computer program that requires precise dimensions. Therefore, we recommend the following rules:
All dimensions must be in centimeters, for example: 10m 50cm = 1050sm;
for walls less than 50cm should indicate millimeters, for example: 49,7 cm;
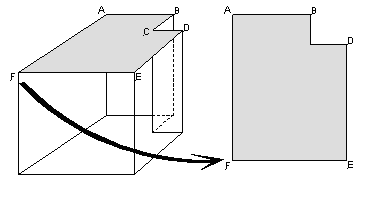
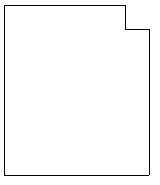
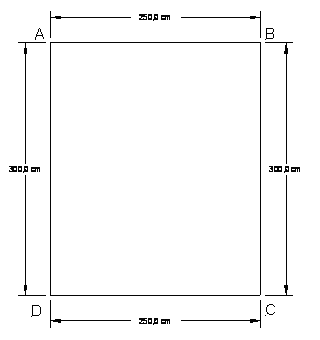
drawing the ceiling should have a view from above, as if you put him on the floor (Fig. 1, 2,3);
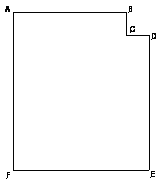
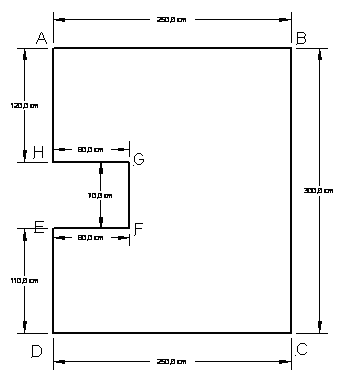
every angle is denoted by the Latin alphabet, in a clockwise direction (Fig. 4);
remove dimensions at ceiling height, specify the location of pipes, ledges, sliding doors and partitions;
please indicate on the drawing the location of windows and doors in the room, it will correctly position the seams towards the light;
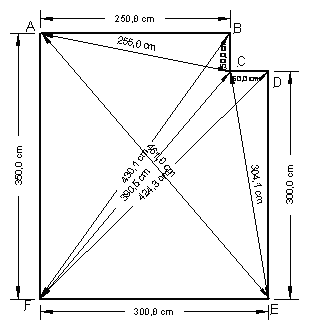
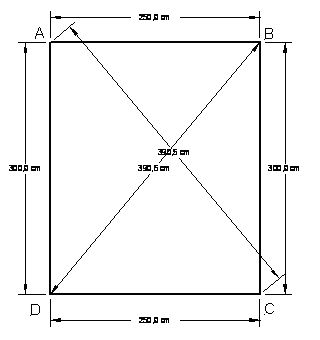
begin to shoot from the perimeter dimensions, then all the diagonal (Fig. 5.6);
in the case of curved ceilings break the arc into segments of 20-40cm, label each point of the Latin letter, and then remove all visible diagonal.
Cutting the ceiling is used a computer program that requires precise dimensions. Therefore, we recommend the following rules:
All dimensions must be in centimeters, for example: 10m 50cm = 1050sm;
for walls less than 50cm should indicate millimeters, for example: 49,7 cm;
drawing the ceiling should have a view from above, as if you put him on the floor (Fig. 1, 2,3);
every angle is denoted by the Latin alphabet, in a clockwise direction (Fig. 4);
remove dimensions at ceiling height, specify the location of pipes, ledges, sliding doors and partitions;
please indicate on the drawing the location of windows and doors in the room, it will correctly position the seams towards the light;
begin to shoot from the perimeter dimensions, then all the diagonal (Fig. 5.6);
in the case of curved ceilings break the arc into segments of 20-40cm, label each point of the Latin letter, and then remove all visible diagonal.
 |
1
 |
2
 |  |


Sizing ceilings with 4.8 angles.
 |  |
4 corners: the perimeter and the letter of the angles | 4 corners: 1 diagonal and diagonal control |
 |  |
The principle of the diagonals:
This is a basic principle, which is based on elementary geometry. To determine the position of points and / or to determine the angle, it is sufficient to know the length of its three sides. Thus, to ensure proper removal of measurements necessary to divide the plan ceiling into triangles, measuring the sides and the hypotenuse.
X - 3 = n, where X - number of angles, n - number of diagonals.
In our example, the 8 corners: 8 - 3 = 5 diagonals.
If the room is 12 angles: 12 - 3 = 9 diagonals.
Removing the control of diagonals:
For greater accuracy, but the basic need to take control of diagonals diagonals, which can achieve greater confidence that the ceiling will reveal correctly.
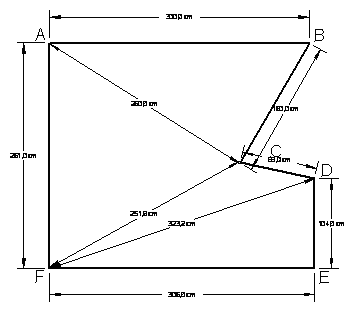 | 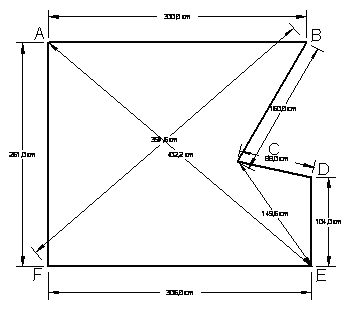 |
diagonal | Check the diagonal |
Does your plan view from above;
Do all sizes removed at installation profile;
Do all sizes around the perimeter shot;
Indicated by a color and fabric type profile, and location of windows and doors;
Did you remember to write your name and address.
Operation number 2. Installation of the mounting profile
Typically, the profile is fixed to the wall, back to back, around the perimeter, at the height necessary for you, which is fighting off a water level or laser.
The profile can also be attached end to end to the existing ceiling in order to not "lose" the height of the room .
If provided in the ceiling spotlights, your ceiling should be lowered to a height of leg lamp, ie, at least 7 cm.
Profile has a length of 200cm. If necessary, it must be cut or mounted back to back to each other, if the length of the wall exceeds 200cm.
These examples are provided to harpoon type "CLIPS" - bezschelevoy whose application does not require additional cover in place fit the perimeter of the ceiling to the wall with decorative elements.
Cutting the mounting profile
carried out:
using a circular saw for metal;
with the hacksaw.
PVC profile mounting an incision with a knife and breaks.
After cutting and clean up the profile slightly rounded sections to the sharp corners do not damage the film.
interior angles;
outside corners
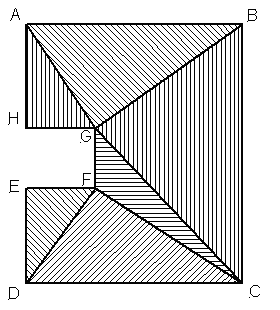
In any case, the profile at the corners do not have to join at an angle of 45 �. When mounting the profile in the inner corners of his end shall be supported: 1. when using a harpoon "tooth" - 3 mm from the corner and 2. when using a harpoon "CLIPS" - 8-10 mm from the corner. When mounting the profile in the outside corners of his end shall be supported: 1. harpoon in the application "tooth" - 2 mm from the corner and 2. when using a harpoon "CLIPS" - 5 mm from the corner. Then, at a distance of 5 mm from the bottom of the profile cut corner at an angle of 45 �, as shown in Fig. 5. This procedure applies only to the corners!
Do the same on the other hand the profile in the corner
 |
In the corner profile should be fixed as shown in Fig., Leaving a gap of 0.5-1.2 cm between the edges of the profile:
 |
Installation of the mounting profile
1. Repel level with the water level or laser on the top edge of the profile
 |
2. Start the installation with the profile angles. To do this:
for small ceilings, walls of length not exceeding 200cm, follow the principle described above.
for high ceilings, where the length of the walls exceeding 200cm, fix small sections (30-50cm) on each side of the angle, secure from further distance of about 5 cm on each side of the angle.
3. Install the profile on the straights. Usually it is enough to strengthen the profile with a step 12cm in terracotta and metal, with a step of 8 cm - in the walls made of plasterboard, brick and concrete. Make sure that at the junction of the profile was not level difference!
Preparation of a profile in the studio
We assume that the room has the following dimensions
 |
You need to 13m profile.
The length of AB = 250 cm. The required profile length: 2 m + 48.4 cm
Length of BC = 50 cm. The required profile length: 48.4 cm.
The length of CD = 50 cm. The required profile length: 48.4 cm.
The length of DE = 300 cm. The required profile length: 2 m + 98.4 cm.
The length of EF = 300 cm. The required profile length: 2 m + 98.4 cm.
The length of FA = 350 cm. The required profile length: 2 m + 148.4 cm.
Operation number 3. Installation of posts for spotlights
To install the spotlights you must have:
lamp;
fortified ring of Forex;
cyanoacrylate glue;
a box the size of the lamp with ventilation holes in acrylic plastic, or forex, which will be attached to the existing ceiling and can withstand the weight of the lamp.
After installation, the fastening profile you need to install a box for each lamp at the desired height, with nut for adjusting height. The lower edge of the box should be at a stretched film
Using a laser or plumb make a mark on the floor, corresponding to the center of each lamp. This is necessary in order to make it easy to find the box after the installation of the film.
You've already decided on the number of fixtures and their location in the ceiling. Typically, a few lights are powered in one chain to ensure that they were lit simultaneously from a single switch. Do you have a choice: to put a transformer on a few lights, or by one transformer for each lamp. Every transformer is connected to the voltage of 220 V.
If you choose a transformer on a few lights, you will need one cable for 220 V power supply. Power transformer is determined by the power of light bulbs in the circuit and can be determined by the follow diagram:
Example: 2 bulbs of 35 W = 70 W � transformer 110 VA
Example: 3 bulbs of 35 W = 105 W � transformer 150 VA
Example: 3 bulbs of 50 W = 150 W � transformer 200 VA
From Fig. 12 that the 220 V line must be connected to 220 V transformer. From the terminal of the transformer 12V out cables of at least 2 mm, which should be thoroughly screwed. This cable adapter you need to connect - separator for connecting lights.
 Operation number 4. installation of the film If you set the canvas for the first time, do not be afraid to make mistakes, you only need to follow certain rules, and you'll be surprised by even the simplicity of installation. 1. The canvas is not afraid of moisture, high temperature (100 � C), any mechanical effects; 2. The canvas is afraid of piercing and cutting items! 3. Start working with a cloth with clean hands; 4. Do not let the cloth fall to the floor to avoid contamination; 5. Do not let the dangerous proximity of heat sources (gas generator, building a hair dryer, etc.) to the canvas; 6. Do not use spot lighting with incandescent bulbs over 60 watts power; 7. Expand the canvas slowly, with constant heating. Remember: the middle leaf is always colder, so the non-observance of the rule blade can crack; 8. Expanding the canvas with a constant heating, hang it on the clothesline in the corners of the room; 9. If the fabric paint, it must be otglyantsevat. To do this, take a gas generator in hand, move it to a distance of about 1.5 m from the track and mimic sweeping film. The cloth should get brighter when glyantsovke leaves most of the wrinkles. When the blade begins to tremble in the air stream and begins to shine well, the process of polishing can be complete; 10. Installation of paintings start from the corner, which is indicated on the plan. To do this, move the lock harpoon to the profile and press down with your finger until it clicks. Clicking says that the harpoon lock is in place within the profile. Secure in this way for about 10-15cm on each side of the angle. 11. secure in this way the angle of the diagonal spaces, then all the other corners heating technology As already mentioned, the ceiling is reduced by 5 - 10%. You need to heat the fabric to give it flexibility. Heat the need to measure, ie to warm up the canvas, if it is cold and it was tough, but do not overheat to such an extent that the harpoon too soft. For small areas will suit even a hair dryer or a small gas heater that runs on propane. Be very careful with the heat source: do not bring it too close to the canvas: hairdryer power 1000W (max 30cm). The gas gun is placed on the floor, usually at a distance of about 1m80sm from the ceiling. Also firmly attach is not yet installed the film on the pin so that it fell to the gas generator. NOTE: If you use a gas generator, ventilate the room periodically to saturate it with oxygen. Work in unventilated areas is prohibited! 12. installation on straight, start from the middle of one side. After this complete assembly of one half of the wall, then the other half. Similarly, mount the film on the opposite wall, then on the other
| |||||||||||||||||||||||||
| |||||||||||||||||||||||||


 |  |
Connect the power cord and plug a lamp into the box. Insert the bulb
Finally
1) Select the desired height of the ceiling:
with built-in lights canvas will be stretched to a distance of at least 7 cm from the existing ceiling;
without built-in lighting profile can be set at any height;
2) repel the level of the ceiling on top of the profile;
3) Remove the dimensions (height profile);
4) draw a plan of the ceiling (top view) - perimeter, mark the corners of the letters in a clockwise direction, clear the diagonal, and diagonal control, select a color and fabric type profile;
5) order the ceiling;
6) with built-in lights: make a layout wiring, secure the transformer (s), attach the rack for lights at the level of the film, with the possibility of adjusting the height of the box;
7) Prepare the Mounting profile: cut the required pieces minus 2 cm, cut the corners at an angle of 45 � at a distance of 5 mm from the edge of the profile;
8) to fix the profile drawn by the level (in the corners to further strengthen);
9) carefully expand the film;
10) otglyantsuyte canvas;
11) fix the first corner;
12) Use the hook to fix the film on flat areas;
13), heat the blade to measure (either too little or too much);
14), season with all the angles;
15) mount the midpoints of the sides;
16) complete the assembling of the film;
17), warm the film or the entire room, if necessary;
18) Leave to cool the film;
19) with built-in lights: glue fortified ring, cut the tape inside the ring, attach the cable and insert the lights;
20) Wash the ceiling.Wash the ceiling
The canvas is very easy to clean. Use a soft cloth or sponge, do not leave fibers. The cloth can be washed almost any glass cleaner that contains no fat. Avoid cleaners that contain soap. Do not be afraid if the canvas will sag too much under the arms, remember that the film is solid and the action of any mechanical deformation, it returns to its original position.