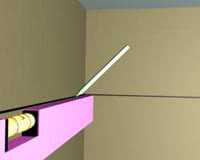
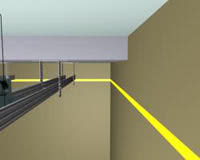
On this page you the installation instructions provided by the ceiling of plasterboard. To get started you need to layout design of the ceiling around the perimeter of the room on the walls with the level, length of which shall be not less than 1.5 meters, gidrourovnya, shnurootboynogo device (according to the design layout to produce).
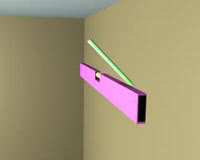 Instead, the level and gidrourovnya on large construction projects for the rapid implementation of a breakdown is advisable to use a laser level. A properly designed structure can save up to 10-15% of the sheets (plates) and profile.
 Installation of plasterboard ceiling (Fig. 2)
With the established step for this type of roof and type of load anchorage points perform markup suspensions. In places the ceiling layout with punch in the carrier under drilled holes with a diameter of 6 mm and a depth of 40-60 mm. If the bases are made of wood, for fastening the frame should be used krupnorezbovye screws, no drilling prezvoritelnogo.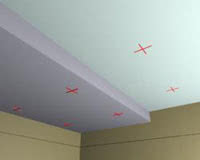
Installation of plasterboard ceiling (Fig. 3)
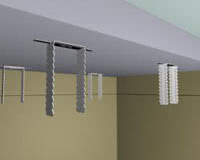
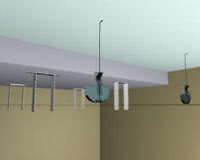
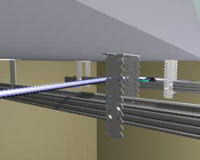
This suspension system for mounting a basic profile of the bearing structure is used to direct suspension. If there are differences of level of support structure (ceiling) is greater than the length of the direct suspension, the suspension should be used in addition to PP profiles. Consider the following case. For attaching hanger for PP profiles first installed thrust. In the supporting structure according to the markup, drilled a hole (6 mm in diameter and 40 mm deep). Insert the eyelet of the anchor rod-block (the anchor dowel). Score a wedge-anchor (anchor dowel) into the drilled hole with a hammer until it locks.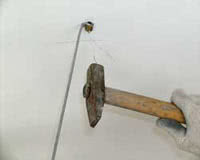
Installation of plasterboard ceiling (Fig. 4)
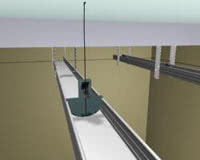
Next, mount the hanger straight, which is fastened by means of the same anchor-wedge.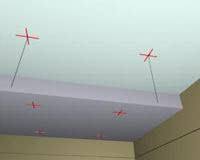
Installation of plasterboard ceiling (Fig. 5)
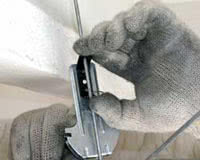
The anchor is inserted into the wedge-plate direct suspension and hammered into an opening in the pre-load-bearing structure (the size of the holes 6 mm in diameter and 40 mm in depth). Technological slot in the forward suspension for not fully hammered a wedge-anchor allows you to accurately position the hanger before full fixation.
 Then you need to bend the suspension of direct lateral stripes at an angle of 90 degrees.
 Attach the hanger rod, holding the spring clip in a compressed state, which is located on the suspension. Adjust the height. To fix release spring clip. If you pull the suspension is too long and prevents further assembly, bend to one side.
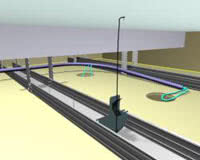
 After attachment to the supporting base suspension is mounted on the main PCB are 60x27 profiles or wooden bars 50x30 mm with subsequent checking and balancing the horizontal level, according to markings on the wall. The length of the main profile (bar) must be less than the length of the room by 10 mm.
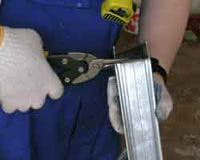
 If necessary, a pair of scissors Cut the profile of the metal, according to the plan assembly.
 Binding basic profile PP 60x27 and direct suspension by using screws LN 16.
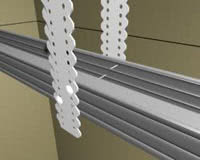 Tie hanger (hanger for PP profiles) into the basic structure so that the depth of the grooves were curved upper edges of the profile. Make sure that the basic structure was located parallel to the markup on the wall.
 On the perimeter, the ground near the wall drywall glued sealing tape. Then you need to prepare drywall sheets for installation. With the end edges of the drywall sheets, not pasted cardboard, with marginal planing should be chamfered at an angle (22.5 degrees - about 2 / 3 the thickness of the sheet).
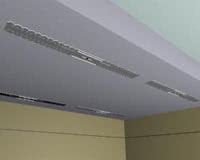
 Before you install drywall, position in the design of all electrical wiring, guided by safety. All cable must be passed in a special cable channels. Cable must not touch the sharp edges of the metal frame, and should not be run in sections to avoid damage to the insulation, and closure. Next to the placement of lamps implied, pull the cable a bit, so then it can be easier to find. If the holes in the drywall under the lights will be cut out after it was mounted on the frame (that is in limbo), then make sure that does not damage the cable.
 Install using props, telescopic hoist or by hand plasterboard in the design position and secure them to the frame. Plasterboard placed horizontally adjusted to each other and screwed to the frame with screws, thus should not be allowed to deformation. Laying of sound-proofing material (if necessary) is parallel to the mounting of each sheet of paneling. The thickness and density of sound-proofing material shall be calculated and included in the loads when selecting the type and design of the ceiling.
Fixing of the need to maintain the angle of plasterboard in two mutually perpendicular directions. Plasterboard fixed to the frame with screws, located on the steps of 150 mm vrazbezhku on adjacent sheets at a distance of not less than 10 mm from the edge of the sheet covered with cardboard and not less than 15 mm from the cut. Fixing screws must be in the plasterboard at right angles and penetrate into the metal frame profile to a depth of not less than 10 mm, and the wooden beam - not less than 20 mm. Heads of screws must be recessed into the plaster to a depth of about 1 mm for subsequent plastering, with screw cap, should not break the board.
Drill holes for the lights, if they nebyli made in advance.
 Join plasterboard should be only on the carrier profiles of the framework. Cardboard in places twist screws should not be disheveled. Warped or incorrectly placed screws must be removed and replaced with new ones that should be placed at a distance of not less than 50 mm from the previous site of attachment.
 Here is the instruction on installation of the ceiling drywall. We strongly recommend you look at the other page of this section, for a more complete picture of the installation of drywall.
Related Content : The device of multi-level ceiling, Installation of plasterboard ceiling video, Mounting sibling and multi-level ceiling,
The ceiling of plasterboard
With the established step for this type of roof and type of load anchorage points perform markup suspensions. In places the ceiling layout with punch in the carrier under drilled holes with a diameter of 6 mm and a depth of 40-60 mm. If the bases are made of wood, for fastening the frame should be used krupnorezbovye screws, no drilling prezvoritelnogo.
Installation of plasterboard ceiling (Fig. 3)
This suspension system for mounting a basic profile of the bearing structure is used to direct suspension. If there are differences of level of support structure (ceiling) is greater than the length of the direct suspension, the suspension should be used in addition to PP profiles. Consider the following case. For attaching hanger for PP profiles first installed thrust. In the supporting structure according to the markup, drilled a hole (6 mm in diameter and 40 mm deep). Insert the eyelet of the anchor rod-block (the anchor dowel). Score a wedge-anchor (anchor dowel) into the drilled hole with a hammer until it locks.
Installation of plasterboard ceiling (Fig. 4)
Next, mount the hanger straight, which is fastened by means of the same anchor-wedge.
Installation of plasterboard ceiling (Fig. 5)
The anchor is inserted into the wedge-plate direct suspension and hammered into an opening in the pre-load-bearing structure (the size of the holes 6 mm in diameter and 40 mm in depth). Technological slot in the forward suspension for not fully hammered a wedge-anchor allows you to accurately position the hanger before full fixation.
Fixing of the need to maintain the angle of plasterboard in two mutually perpendicular directions. Plasterboard fixed to the frame with screws, located on the steps of 150 mm vrazbezhku on adjacent sheets at a distance of not less than 10 mm from the edge of the sheet covered with cardboard and not less than 15 mm from the cut. Fixing screws must be in the plasterboard at right angles and penetrate into the metal frame profile to a depth of not less than 10 mm, and the wooden beam - not less than 20 mm. Heads of screws must be recessed into the plaster to a depth of about 1 mm for subsequent plastering, with screw cap, should not break the board.
Drill holes for the lights, if they nebyli made in advance.
Related Content : The device of multi-level ceiling, Installation of plasterboard ceiling video, Mounting sibling and multi-level ceiling,
The ceiling of plasterboard