Overview
Knauf plasterboard TIGI, having such notable properties as the ability to "breathe" effectively counter the effects of fire, absorb sound at low frequencies, as well as other qualities that have made it an indispensable building blocks for the construction of light interior partitions, walls and ceilings device is listed along with the characteristics of another remarkable ability - to acquire the plasticity of wet and restore the original quality after drying, while retaining the shape imparted to it in the plastic state. This property allows us to significantly expand the architectural features drywall through the formation of curved surfaces like ceilings and walls.
In the manufacture of curved forms are mainly used plasterboard width not exceeding 600 mm, with a minimum bending radius of 12.5 mm thick sheet of about 1000 mm. With decreasing thickness of the drywall bending radius is also reduced - so for sheets 9 mm minimum bending radius is 500 mm.
Mounted on a curved sheet metal frame, the basic elements that most often, especially in ceiling systems are PP-60 / 27 profiles, which are also pre-bent to the required radius of the formed surface.
PP-curved profiles TIGI Knauf made with any (not less than 500 mm) radius at a special bending machines.
Preparation for work
Preparation is mainly in the manufacture of a template that will be made flexible plasterboard (Fig. 1):

Preparation is mainly in the manufacture of a template that will be made flexible plasterboard (Fig. 1):
- Using drywall, mark and cut the sidewall pattern that will provide the necessary bending radius.
When making a template, its radius is advisable to make a little smaller than the radius of the formed surface;
- Mark out and cut, also made of plasterboard, the spacer plate, the dimensions of which should provide the necessary width of the pattern, slightly less than the width of a flexible sheet;
- Using pieces of wood, with screws, assemble the template.
- Prepare the clips for fixing the ends of a flexible sheet (such as segments of a suitable PC or PN-profile).
In Fig. 2 shows an example template for sheet size of 2400 x 600 x 9 mm.
The procedure works
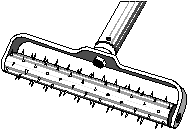
- Rolled with a spiked roller (Fig. 3) compresses the sheet. In a convex forms the back side, the concave - front;
When making a template, its radius is advisable to make a little smaller than the radius of the formed surface;
- Mark out and cut, also made of plasterboard, the spacer plate, the dimensions of which should provide the necessary width of the pattern, slightly less than the width of a flexible sheet;
- Using pieces of wood, with screws, assemble the template.
- Prepare the clips for fixing the ends of a flexible sheet (such as segments of a suitable PC or PN-profile).
In Fig. 2 shows an example template for sheet size of 2400 x 600 x 9 mm.
The procedure works
- Rolled with a spiked roller (Fig. 3) compresses the sheet. In a convex forms the back side, the concave - front;
- Pin-up sheet to put on pads in order to avoid getting water on the opposite side of the plasterboard. Otherwise, possible breaks when bent cardboard;
- Wet harvesting water with a sponge or brush. Processing to produce up to full saturation of gypsum core (the water ceases to soak);
- Set the workpiece on the template so that its center coincides with the axis of the template and carefully bend on it. Attach the panel by means of clamps;
- Fix fold panels, for example by means of adhesive tape, remove the panel from the template and set in the same position for drying;
- To start producing the next item.
installation of ceiling
- Set the curved profiles using direct hangers. When mounting the profile of an overlap length of the suspension is not enough, you can use the pin lengthening or lengthening the elements of a special vernier suspension;
- Using a two-level connectors installed bearing ceiling profiles at 300 - 400 mm from each other;
- Place the curved plasterboard element on the frame, fixing it with a wooden T-shaped base, which is installed in the spacers between the drywall sheets, and sex;
- Fix a sheet on a frame with self-tapping screws. Installation screws to the direction from the middle of the plasterboard to the edges;
- To make grout by the standard technology, and if necessary, and putty the entire surface.
In the manufacture of curvilinear linear drywall sheets to ensure that the exposed side of the leaf is visible
surface of the ceiling.
Making curved parts of small radius (R = 100 - 400 mm)
This method of forming a curved or polygonal shapes based on a special but simple equipment with which a sheet of plasterboard 12.5 mm thick at the back of his parallel grooves milled U-shaped (for curved surfaces) form, without damaging the board face of the sheet. The distance between the grooves depends on the requirements for the form of bending and thickness of the cutter. Reducing the distance between the grooves and increase the thickness of milling leads to the formation of a smoother bend tench.
The sequence of work:
- Milled sheet to lay on a pre-prepared template slots up and thoroughly cleaned from dust;
- Putty groove with putty "Uniflot" and allow to dry;
- Fix ready for a fragment of a frame;
- The joints of adjacent elements on the back side
- Set the pattern for curved steel bars with a thickness of 0.5-0.6 mm width 100 mm, securing them with screws;
- Putty joints, and then the entire surface.
make a layout on the floor and wall with a plumb move it to the ceiling;
- Scissors cuts parallel to the metal to the outer shelf and back Mon-profile to the inner shelf;
- Bend the profile according to the desired radius, and install markup, securing with dowels in increments not exceeding 300 mm;
- Set the rack profiles with a step of no more than 300 mm, fixing them in the guide;
- Set the curved rock sheets, placing them across the rack profiles;
- Putty joints.
The minimum bending radius of drywall (mm)
1. In the wet state:
tlista = 6.5 mm R> 300
tlista = 9.5 mm R> 500
tlista = 12.5 mm R> 1000
2. In the dry state:
tlista = 6.5 mm R> 1000
tlista = 9.5 mm R> 2000
tlista = 12.5 mm R> 2750
1. In the wet state:
tlista = 6.5 mm R> 300
tlista = 9.5 mm R> 500
tlista = 12.5 mm R> 1000
2. In the dry state:
tlista = 6.5 mm R> 1000
tlista = 9.5 mm R> 2000
tlista = 12.5 mm R> 2750